Test.ai’s Appium plugin: How does it work, and how accurate is it?
Published 21 Nov 2018.
At the recent Selenium Conference, Test.ai (a startup doing “AI-Powered Test Automation”) announced that they open-sourced one of their Machine Learning models as a plugin for Appium, which is a popular test automation tool for testing mobile apps. In this article I explore what Test.ai’s Appium plugin does, how it works, and how well it performs (in terms of accuracy).
Summary for the impatient:
What it does: Allows you to find an icon that’s visible in the application-under-test —as long as it looks like one of 105 pre-trained labels like “cart”, “edit”, and “twitter”— just by asking for the label name.
The image-classification model is MobileNet v1 (which is made by Google), but Test.ai have retrained the final classification layer on icons of shopping carts (and “edit” buttons, and twitter icons, etc) by following this TensorFlow tutorial.
Accuracy: 68% overall accuracy and 81% recall, measured on the same images it was trained on (which in theory gives the best-case performance; real world usage may be worse). At the Selenium Conference a figure of 98.9% was given; it isn’t clear how that was measured.
Disclaimer: I am not affiliated with Test.ai or Appium. I am co-founder of a test-automation company (Stb-tester), though not in the mobile or web space.
All measurements and analysis were done using the latest master branch of appium-classifier-plugin and classifier-builder (git commits 8717e43 and 4fa0cfb, respectively).
What the plugin does
elementByXPath("//*[@id='Cart']")Traditional XPath selector
In an Appium or Selenium test you call an API to find the UI element you want to interact with (for example a button, so that you can click it). Typically you identify the element by specifying a CSS or XPath selector. Judging by the amount of talks on the subject at Selenium Conferences over the years, this is difficult to maintain, presumably because the DOM structure of the application-under-test changes frequently due to refactorings.

elementByCustom("ai:cart")New selector, and example cart icon
Test.ai’s Appium plugin allows you to find an element by looking for an icon like a shopping cart, edit button, or the twitter logo. It does this by taking screenshots of each UI element and running the screenshots through a neural network (“the model”) that knows how to recognize 105 specific categories, or labels. Here are the 105 labels currently supported.
It isn’t suitable for finding a text box, or a drop-down list, or a button with text, or any other UI element that isn’t an icon.
Note that there have been other talks at previous Selenium Conferences about Machine Learning applied to element selectors. In particular I remember Oren Rubin in 2016 who demoed his product Testim.io, which is a proprietary record/playback tool that captures all of an element’s properties (not just the CSS ID or class, but also the text, size, location?) and uses statistics/Machine Learning to continue to recognize the element even when some of those properties change. But the Appium plugin that I’m discussing in this article is exclusively looking at screenshots of each element.
Is this better than the traditional CSS / XPath selectors?
| Selector strategy | Potential change of behaviour (of your tests) | When it doesn’t work |
|---|---|---|
Traditional CSS/XPath |
|
|
Test.ai’s image classifier |
|
|
With the image classifier, your test’s behaviour will only change if the application-under-test has changed in a visible way; it isn’t affected by refactorings that don’t change the app’s appearance to the end user.
Or, your test’s behaviour might change when you upgrade the Appium plugin, but this should happen far less frequently than changes to the application-under-test; and the version of the Appium plugin can be managed explicitly using npm’s version pinning.
On the other hand, when the traditional selector strategy fails it’s easy to understand what happened, and the (short-term) solutions are well understood. Fixing the image classifier requires re-training the Machine Learning model, and getting Test.ai to accept your changes upstream.1
How it works: The Appium plugin
Appium implemented an API for external plugins specifically motivated by the Test.ai plugin, which so far is the only plugin. You can see Test.ai’s plugin on github: testdotai/appium-classifier-plugin.
The entry point of an Appium plugin is a function called find. In Test.ai’s plugin, the find function takes the desired label as an argument (for example “cart” for a shopping cart).
You can see the high-level algorithm in lib/classifier.js::find:
Get all leaf DOM elements from the application under test, including each element’s coordinates and size.
Get a screenshot of the application.
Crop the screenshot into lots of little screenshots, one for each of the elements from step 1.
Run each element’s cropped screenshot through the neural network. (If this seems like a dumb, brute force approach for finding things within a larger image: This was essentially the state of the art in Machine Learning algorithms as recently as 2015. Even with recent advances, I don’t think you could do much better.)
First resize each image to 224✕224 pixels, because that is the input size that the model (the neural network) expects.
The model returns a list of 105 “predictions”: The probability that this image matches each of the 105 labels that the model knows about.
For each image, if the top prediction matches the label you asked for, and the confidence is greater than 20%, consider it a match.
Sort the matching elements by the confidence score, and return the highest one. Actually it returns all of them, and Appium decides whether to give you the first one (if you called elementByCustom) or all of them (if you called elementsByCustom).
Appium plugins are written in node.js, so it uses TensorFlow.js, which is the javascript version of TensorFlow, a Machine Learning framework. The actual model is a 3MB binary file that is included in the plugin source distribution: see appium-classifier-plugin/model/.
How it works: The model (neural network)
The model is a neural network that takes a 224✕224 pixel 3-channel colour image as input, and outputs 105 numbers that represent the confidence or probability that the input image matches each of the 105 labels that the model knows about (cart, edit, twitter, etc.)
The model is MobileNet v1,2 which is a pre-trained model released by Google AI. MobileNet is a “deep”, “convolutional” neural network.
A convolution is an image-processing operation that runs a 3✕3 pixel filter (or 5✕5, or 7✕7) across the image: For each pixel in the image, it does a weighted sum of the neigbouring pixel values, according to the weights specified in the filter. For example, in traditional image processing you might use the following filter to find vertical edges:
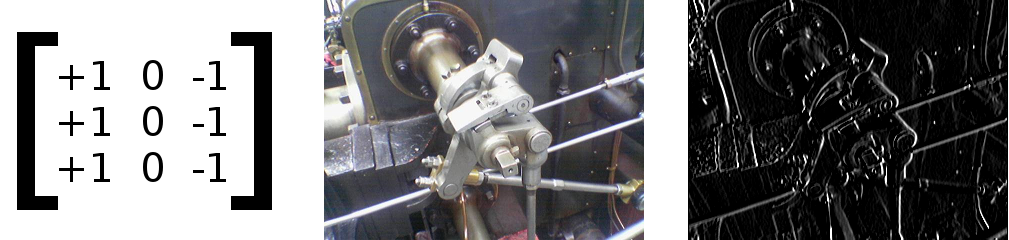
3✕3 filter, colour image of a steam engine (from Wikipedia), and the result of the convolution operation.
Here is how you interpret the output of the convolution: A large value (which shows up as white in the image above) means that there is a vertical edge at the corresponding location in the input image.
A convolutional neural network (ConvNet) does many convolutions using different filters. Each filter detects a different type of feature: for example vertical edges, horizontal edges, diagonal edges, brightness, red-ness. Unlike our example filter above, the coefficients of each filter aren’t specified by a human; they are learned (or discovered) by the machine through a training process.
A deep network has many layers of these convolutions. Each layer acts on the output from the previous layer, instead of the original image pixels. This way the network learns more abstract features like “fluffiness” or “this thing in the top corner looks a bit like a floppy ear”. In practice the features are very abstract and hard for a human to interpret so they won’t fit into easily describable concepts like “fluffiness”.
MobileNet v1 has 14 such layers. The first layer extracts 32 different, low-level features for each pixel in the input image. By the time it gets to the last layer, it is extracting 1024 high-level features that describe the image as a whole.
After the 14 convolutional layers there is a final classification layer. This doesn’t use convolutions; instead it uses linear regression3 to decide, based on the 1024 high-level features, is this a cat or not. Actually it learns 1,000 different regressions, one for each category that the model has been trained on.
MobileNet was trained (by Google) on millions of photographs from the ImageNet dataset: People, animals, streets, landscapes, objects. It was trained to recognize 1,000 different categories like “bird feeder”, “cat”, “musical instrument”, “outdoor sport”, “person”, “poisonous plant”.
How it works: Training the model to recognize app icons
What Test.ai have done is take the MobileNet model made by Google, remove the final classification layer, and train a new classification layer on examples of the relevant icons, while keeping other layers of the model unchanged.
This is easier than it sounds: Test.ai’s training script is literally the script from this TensorFlow tutorial. The majority of the work would have gone into creating the training data by scraping the internet for 75,000 example icons across the 105 categories.
The idea behind this approach is that MobileNet already learned to extract generic features that are useful for understanding images in general; looking at these features is enough information to decide whether something is a shopping cart icon or not. This is called transfer learning: Knowledge learned while solving one problem is useful for solving a different problem.
That’s the theory, anyway. As we’ll see below it doesn’t work very well in this case.
Re-training the model in this way is much much cheaper than training the complete model from scratch, both in time (minutes instead of weeks) and in the number of training images required (thousands instead of millions).
The training data is open source too
Test.ai have provided scripts and instructions for training the model, as well as the training data, so third parties can improve the model and the training data. See testdotai/classifier-builder on GitHub and the accompanying article Training Data for App Classifier.
I’d like to see Test.ai publish official accuracy measurements, a separate set of validation images (that aren’t used during training), and scripts to reproduce the measurements. Without this it will be difficult to evaluate any contributions from the community.
Some details about the model are still missing — it’s a binary blob so it’s hard to tell exactly which variant of MobileNet it is (MobileNets come in 16 different sizes). I’d like to see documentation about this, and the design decisions: Why was this model chosen, why train on greyscale images, etc.
Speed
On my Intel i7-4578U TensorFlow takes 200 - 300ms to process each image.
Depending on the number of DOM elements on the page, a single find operation will take several seconds. In the demo at the Selenium Conference it took about 6 seconds.
Accuracy
Best practice in Machine Learning is to test a model using a different dataset than you used to train the model. These neural networks have so many parameters that they can sometimes overfit the training data, and fail to generalise to new inputs.
However I don’t have a test dataset, so I have tested the model on its own training data. This should give us the best-case accuracy; in real-world usage the accuracy will probably be lower.
The simplest accuracy measure is: Does the predicted label match the correct label?
| Measurement method | Accuracy |
|---|---|
| Appium plugin’s accuracy (top-1 > 20% confidence) |
68% |
| Top-1 accuracy | 70% |
| Top-5 accuracy | 87% |
“Top-1” means: Does the top (most likely) prediction from the model match the actual label? (Regardless of the model’s confidence in that prediction.)
“Top-5” means: Does the expected label match any of the top 5 predictions from the model? It improves the overall accuracy by reducing false negatives but it does increase false positives significantly (false positives for “cart” increased from 6% to 63% of all “cart” responses).
Top-1 and Top-5 are typical metrics used in Machine Learning literature.
The Appium plugin matches the top-1 prediction, but only if it exceeds a confidence threshold which defaults to 0.2 (20%). It doesn’t look at the top-5 predictions if the top-1 isn’t the label you asked for.
Note that the model expects a 3-channel colour image, but it was trained on greyscale icons; the Appium plugin doesn’t convert the screenshots to greyscale before running them through the model (see “future work” below), whereas my measurements did (see “methodology” below). So the actual plugin’s performance may be worse than this.
Precision and recall
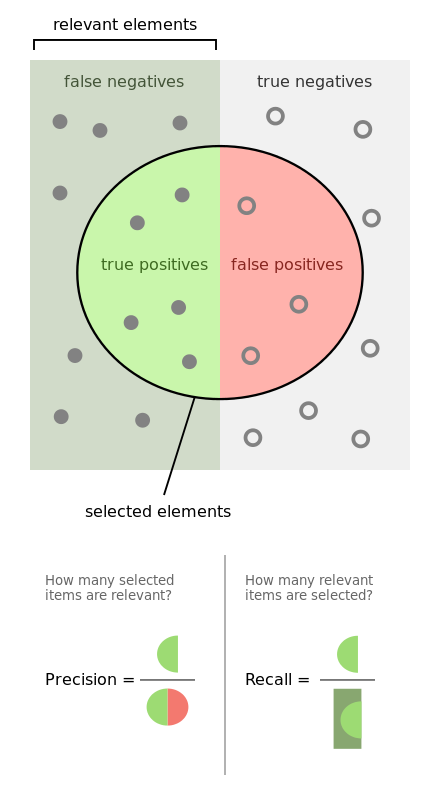
From the Wikipedia article Precision and recall
Machine Learning researchers use more sophisticated accuracy measures such as “Precision” and “Recall”. At Test.ai’s talk at the 2018 Selenium Conference in Chicago, they said “if there’s a shopping cart, we’ll find it with 98.9% accuracy”. In the Machine Learning terminology, this is 98.9% recall.
I tested 200 of Test.ai’s training images for the “cart” label, and found only 81% recall.
| Measurement method | Recall | Precision |
|---|---|---|
| Appium plugin (top-1 > 20% confidence) |
81% (40 false negatives) | 94% (11 false positives) |
| Top-1 | 81% (39 false negatives) | 94% (11 false positives) |
| Top-5 | 91% (19 false negatives) | 37% (323 false positives) |
Here are some of the images that were mis-classified:


The four images above are all false negatives: The model thinks they are “save”, “airplane”, “dollar”, and “light bulb”, respectively, instead of “cart”. For the first two of them, “cart” is in the top-5 predictions (with confidence of 14% and 25%, respectively). The other two don’t have “cart” at all in the top-5 predictions.


The two images above are from the “cart” training data but clearly they aren’t carts (the model thinks they are “printer” and “credit card”, respectively). This shows that the training data isn’t perfect. This may not matter for real-world use, I don’t know; but it does affect my accuracy benchmark. A more carefully curated “validation” or “test” dataset is required for better benchmarking.


The final two images, above, are false positives: They are from the “link” and “trash” training data but the model thinks they are both “cart” (with confidence of 24% and 43%, respectively).
Measurement methodology
I forked Test.ai’s classifier-builder github repository, which contains the model in TensorFlow format (as opposed to TensorFlow.js) and python scripts to run the model against images from disk. I modified run_model.py to test multiple images instead of a single image per invocation, and to output data in CSV format.
All the commands below were run from drothlis/classifier-builder branch “evaluation”, commit b7222ec.
sample_run/run_model.py --samples 10000 --top-k 5 --color > all.csv
./accuracy.py --method top1-with-threshold --threshold=0.2 all.csv
./accuracy.py --method top1 all.csv
./accuracy.py --method top5 all.csv
Future work: Easy improvements
The following improvements to the Appium plugin would only take a few lines of code, and could be done by someone with an interest in Machine Learning who wanted to make their first open-source contribution:
Convert the screenshots to greyscale before running them through the model (because the model was trained on greyscale images). This is an actual TODO comment in the Appium plugin’s source code.
Improve the performance (speed) by passing all images to tensorflow at once. Tensorflow takes an array of images, runs them through the model, and returns an array of predictions. Test.ai’s Appium plugin is currently calling tensorflow multiple times, with an array of a single image each time.
Look in the top-5 predictions if the top-1 prediction isn’t the label you asked for. Further investigation would be needed to choose a suitable threshold.
MobileNets come in several versions. Icons are small images, so a smaller MobileNet (e.g. 128✕128 pixels) might be more appropriate. You might be able to use one of the MobileNets that has higher accuracy, without sacrificing execution time thanks to the smaller input size.
Future work: Research projects
My gut feeling is that you could get much better performance (both in speed and accuracy) from a simpler network designed specifically for icons, which are stylised, artificial images. MobileNet is a neural network that was trained on ImageNet, which is a database of natural images. The features that MobileNet has learned might not be the most revelant, and the complexity of the model may be overkill. However the amount of data required to train such a network means that this is only feasible for someone with access to many different apps, such as cloud-based test automation services or app store operators.
What is a good accuracy measure for the task of finding UI elements for test automation? Clearly we don’t want false negatives —failing to find an element when it is there— or your test will fail even though the application-under-test is behaving properly. But how bad are false positives? For example, say you have a test that expects a shopping cart. If the cart is missing due to a bug, but Appium gives you some other element claiming it’s a shopping cart, your test is probably still going to fail once it tries to click it.
References
- testdotai/appium-classifier-plugin on GitHub.
- testdotai/classifier-builder on GitHub.
- AI for element selection (video), talk at SeleniumConf Chicago 2018 by Jason Arbon and Chris Navrides from Test.ai.
- Adding AI to Appium, article on medium.com by Test.ai.
- Training Data for App Classifier, article on medium.com by Test.ai.
- MobileNets: Efficient Convolutional Neural Networks for Mobile Vision Applications (the MobileNet paper).
- How to Retrain an Image Classifier for New Categories, TensorFlow tutorial.
If you’re going to re-train the model, I do recommend that you put in the effort to get your changes merged upstream; the further you diverge from the official plugin, the harder it will be to upgrade to newer releases of the plugin. And eventually you will want to upgrade.↩
The model is a binary file, so it’s hard to tell. This was stated in the talk at the Selenium Conference. Also, appium-classifier-plugin/model/weights.json contains the string “MobilenetV1” several times.↩
Technically the Softmax function which is a more sophisticated version.↩